Lahua Dafa is Good, and You Can be A Sister in Teaching|。・㉨・)っ♡
1.
Common milk foam problems (please add in later, for the home machine, if there is a picture of sister paper contribution, I can upload the picture to be more intuitive):
Qualified milk foam: it is a dense milk foam with good fluidity. If you shake the garland, the milk foam will not move when it rotates in a circle in the cup. It must be thick. If it feels similar to the texture of the milk that was poured in before, it means that there is not much water vapor in it. If you can see a lot of small bubbles on it, then there are thick bubbles.
1. The milk froth pours on the duang white tuft and falls down without a pattern. Maybe the drawing technique is wrong and the milk foam is thick.
2. The bubbles are very thick, and the final liquid surface is full of thick bubbles. It may be that the milk frothing technique is wrong. The milk froth is not frothed at the later stage of the milk frothing, so it is all thick frothing. It is recommended to find the whirlpool according to Erchun brothers, then the big bubbles can be rolled in, and finally a dense milk foam will be formed. After the beating, it is recommended to put a piece of cloth, vigorously shake the tank to break the thick foam, and then shake the cup to make the milk foam flow well.
3. The top of the milk froth is froth, and the bottom is milk. Maybe after a long time, delamination occurred. It may also be that the air intake was all thick foam before, and there was no dense foam. The garland poured into the milk foam that was not foamed, and the last part was the foamed coarse milk foam.

2.
Cup: It is recommended to use a big belly, it is better to find an injection point. It is not recommended to start with a deep mug to practice (because the deep mug has to be merged until the liquid level rises more and is closer to the mouth of the cup, so the drawing is not easy to fail)
Milk: Many posts suggest refrigerated milk with a milk fat content of 3.5 or more. Refrigeration is to extend the milk frothing time. (In fact, skimmed milk can also be foamed, such as 3d garland)
Regarding the frothing of whole milk, the main consideration is the taste and milk fat content. I have used about seven or eight brands of milk, which are basically imported milk, mostly with a milk fat content of 3.4 and 3.5. Many websites recommend Nestlé with a milk fat content of 3.4. Nestlé is indeed the best-tasting milk I have used so far, and I can clearly feel that it is a better milk. The disadvantage is that there is no cover, it is not easy to save after cutting, and some b2c websites such as Dong Mouya generally do not have it. Other imported milk doesn't feel much different from Mengniu Yili from a good point of view. According to personal experience, the method of frothing milk is better than the choice of milk. You can use it whatever you want.
Thermometer: You can use it at the beginning, but you can basically master it by touching the metal etched cylinder by hand in the later period. If you like to use a thermometer, you can bring your own. (The etched cylinder in the Erchun brother video has a patch to see the color and know the temperature. I haven’t used it before, don’t evaluate whether it’s good or not)
Latte cylinder capacity: 350ml to 450ml is more appropriate. I bought a 700ml metal before and can't handle it.
The most commonly used is 350ml, because many of the nozzles of low-priced household machines are short or the nozzles cannot be moved. If the etched cylinder is too large to reach the milk or the angle is difficult to find. If you add too much milk and waste milk, I personally prefer a 350ml latte jar and add about 150ml of milk.

3.
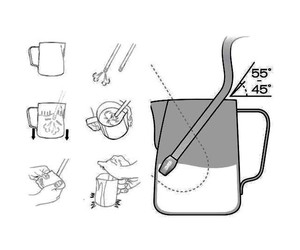
This is the angle diagram of many previous tutorials. Commercial machines generally use this kind of OK, but you will actually find that your home machine can't reach it because the nozzle is too short or the angle can't be adjusted. Personally, I have tried that if the milk froth is rotated, the success rate will be greatly improved, and the milk froth does not have to be dense and does not require a low volume.
The failure of novice milk froth is mostly because the nozzle of the home machine is short and the milk does not rotate, so the milk froth is too thick and thick.

4.
Milk frothing steps (explained separately later)
The main points are summarized as follows. Knock on the blackboard: spray out the water in the steam pipe, proper nozzle position, temperature, air intake in the preliminary stage, and form a vortex after reaching a certain volume (the key to the success of the home machine), shake off the big bubbles and shake the cylinder. Let the milk spin.
1. After the machine reaches the correct temperature, turn on the steam switch, let out the water that always exists in the steam pipe, and then turn off the steam switch.
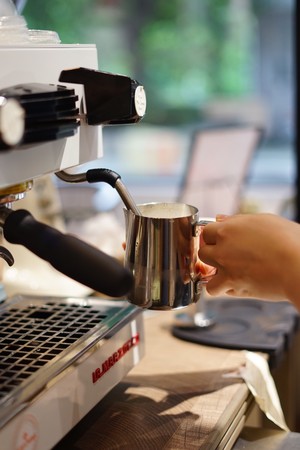
2. Place the nozzle below the surface of the milk and turn on the steam. If you turn on the steam when the nozzle is above the liquid level, you will get larger bubbles, and in order to get rid of these bubbles, you need to have a larger vortex later to get the bubbles in.
3. Slowly bring the nozzle to the surface of the milk. Stop just when the nozzle is about to come out of the surface. Now that the air is sucked into the milk, you will hear the typical sisisi sound. If you accidentally take the nozzle out of the water, the pressurized air will blow onto the milk instead of into the milk, which will create large bubbles.

5.
4. At this stage, you have formed small and medium-sized bubbles on the surface of the milk. Now we will try to remove them. There will be a whirlpool where the air blows into the milk. All bubbles on the surface will be pulled into this vortex and disappear. It is still very important to put the nozzle in the correct position to avoid creating new air bubbles. (For whirlpool adjustment, see the second spring method below)
Note: Stop when the temperature reaches a suitable point. The appropriate temperature refers to 58-65°C (the temperature stated in the Sawada Great Book of God is this), depending on the taste of the individual. Too much frothing time will cause the milk to coagulate and change its taste.
5. Put your free hand on the garland cup to feel the temperature of the milk. When the milk froth rises, you carefully lower the steam tube so that it touches the milk. If you are satisfied with the amount of milk froth and the milk is not warm enough, you can lower the nozzle into the milk. Now the milk starts to swirl. This can make the milk evenly heated by the steam. When your hand feels the temperature is a little hot, keep the nozzle below the liquid surface and turn off the steam.

6.
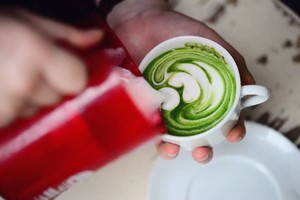
6. Sometimes there are still bubbles in the milk foam that can be beaten. A good way to get rid of these bubbles is to put a veil and knock the garland on the table hard. Don't knock too many times to avoid too thick foam. A good way to determine whether the milk is "thick" or not is to rotate the garland so that the milk starts to form a whirlpool. (If you can find a big video of using your same model of machine to pull flowers on the Internet, you can estimate the volume you have sent by observing the position of other people’s milk tanks and the final position of the milk foam. At the same time, it is recommended to find a video to see what is qualified Good fluidity, dense milk foam, neither thick nor thin)
Regarding whether to scrape the milk foam: It depends on the situation, I basically do not scrape now. If your home machine does not rotate the milk foam, most of the milk foam that comes out is thick foam on the top, and the bottom is similar to the liquid that was initially poured into milk. After scraping the thick foam, you will find that the milk was poured into the soup before. It's a thick bubble of duang, and it's useless if it's scratched.
If you use the air intake to fully blow the rotated milk foam, you can scrape a part of it, and then shake the garland cylinder to make the milk foam more fluid (I also like the two garland tanks to pour back and forth, and the last part of the thick one does not need to be left in Inside the garland jar that does not garland, please note: otherwise large bubbles will form along the wall of the cup.
7.
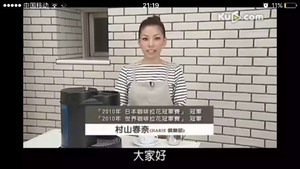
Main points: I personally think that it is ok to put the steam wand in the commercial machine and make milk froth, and there is no special requirement for the frothing volume. The home machine recommends that you add the same milk to the whirlpool, and test whether the different volume is thick or thin. It can basically produce stable milk foam by rotating and fixing the volume for about a week. The video of Haruna Murayama says that the volume is about 1.5. Times (The premise is that you can know what the milk foam looks like and what is thicker and thinner by watching videos or going to coffee shops or watching other people's garland)
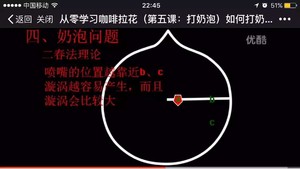
In the main event of hitting the whirlpool, I referred to the theory of the Second Spring Method. In the video of Brother Erchun, the nozzle is put in the nozzle of the garland cylinder, and the transition from b to c can ensure the rotation of the milk foam. This novice can not take a lot of detours. After understanding the selection theory, you can freely control if you want to increase or decrease the vortex (the picture is very fuzzy, it is not clear to click the previous link to watch the video)
If your steam wand is pulled too high during the intake phase and the bubbles formed are too large, you need to adjust the garland cylinder to form a larger vortex before it can be twisted in. The second spring method is just to give you a reference to understand the principle of vortex formation, and does not need to strictly follow the points. The nozzle of my coffee machine is only the length of the index finger and cannot be moved. I can’t install the Erchun brother’s point-position nozzle. I can only play with the cup tilted. Try to move the cup to adjust the angle to find the vortex. If it can form a vortex, my milk froth does not Too big a problem.
Personally, I don’t recommend Erchun's mistress method too much. I think Erchun is easy to operate. In fact, it feels simple for the familiar hands. I don’t know my shape correctly when I hand it out. I currently recommend using Hershey's chocolate sauce for milk. Latte, the density is high, the milk foam has a high fault tolerance rate, and the milk foam is too thick to pull out a good latte, but the disadvantage is that it is difficult to drink (see my other recipe for details)
The detergent method recommended by Erchun personally does not like the smell of detergent, and the lower fault tolerance rate of detergent method is more difficult, and it is easier to undermine self-confidence.
To practice latte, you can use chocolate sauce to mix with milk, cocoa powder to melt water, matcha with tea cup to whipped and dissolve in water, instead of espresso, and I gave up after watching the video using ink.

8.
Lahua is recommended to look at the video. The main point is that there is a process of holding the cup crookedly and filling the cup back to the right. Fusion, injection point, cup back to the right, and finishing are more important. I found a video of Haruna Murayama for everyone to watch. There are many garland patterns inside, and the video link is at the beginning of the recipe.
1. Fusion: Some videos will see the high-low fusion and the circle of the high-low fusion. Of course, whether the fusion is good or not is also related to the good-looking and taste. Novices suggest not to blend or just draw circles to blend. When blending, I usually tilt the center of the cup liquid level to inject (it doesn’t matter if it’s crooked because it can be adjusted at this time). When just poured in, the water flow is medium, no water flow. Too big. If you accidentally thicken the water flow and there is a white lump on it, then raise the garland, so that the big white bubbles can be suppressed.
2. See the video for the injection point selection. Novices suggest that pulling the heart is relatively simple. After the fusion is completed, the cup should be close to the liquid surface, increasing the water flow, and increasing the water flow injection will definitely produce a pattern. The video in the middle of the fusion of the previous step and the selection of the injection point in this step is that the cup is removed after fusion, and then injected. Novices do not recommend this, because you may not be able to control the injection point or water flow when you inject again, and you may not get the pattern for a long time and then it will be full, so it is recommended to do it in one go. In the previous step of fusion, you can move to the injection point of this step by yourself, and it is easy to get started.

9.
Misunderstanding:
1. The injection point selection will look at the cup instead of the liquid level. This is wrong. For example, the center point is used as the injection point, but the center of the cup is looked at. Then you will find that the pattern is biased to the wall of the cup when you return it. The pattern will be ugly.
2. Some people do not change the thickness of the water flow at all. For example, it is almost enough to pull a milk froth, and you don't want to have a big heart, but the cup is still far from full at this time. At this time, you can reduce the water flow and raise the cup appropriately, so that the pattern will not continue to expand. Another example is the finale. The heart, tulip, and leaves all need to raise the garland so that the water flow is particularly thin, so that the ending pattern will look good, if you have a thick water flow, the whole shape of the thick stroke will be destroyed.
10.
I think the words of Brother Erchun Liaomei are quite right: you must personally hold your sister’s hand to operate
If the milk foam is slightly thicker, it is recommended to push the heart, and if it is slightly thinner, it is recommended to play with leaves.
11.
Steps: I personally think: heart→melaleuca→tulip→leaf, and finally swan or something. I am like I was pulling the leaves in the wild at the beginning, and the water flow was not well controlled and it was easy to be magical.
Melaleuca heart is shaking on the basis of the heart, pay attention to the time when you close your mouth, otherwise it will become fat mangosteen, fat apple or something (๑•̀㉨•́ฅ✧
After you control it well, you can try tulips. The key is to tilt the cup at the injection point and control the pitch of the milk foam. Use the pool ball method to squeeze the front milk foam to achieve the effect of bending the front milk foam to form a leaf.
In the later stage, practice the injection point repeatedly, control the water flow, the foaming rate of the milk foam, and the formation of vortex. Use the method of raising the water flow to press the big milk foam into the coffee to keep the liquid surface clean. The indispensable stage for sultry not to fail


12.
The first garland in my life is posted here, but it is milk froth made by a commercial machine!
Violent flower drawing is not advisable, and you need to be cautious when you enter the school to tease girls...

