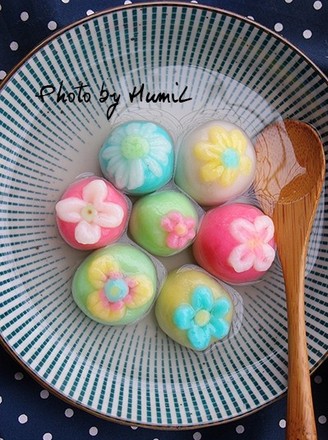
Colorful Snowy Moon Cakes
1.
Sift glutinous rice flour, sticky rice flour, and orange flour into a mixing bowl and mix well;
2.
Pour pure milk and white granulated sugar into the mixing bowl and stir thoroughly until there are no particles;
3.
Add condensed milk and mix well;
4.
Add lard or corn oil, stir it, it doesn't matter if you don't stir it evenly, it will be automatically opened when steaming. Let stand for 30 minutes;
5.
Boil the water pot, put the container into the steamer, stir while steaming until the lard melts, take out the container after about 5 minutes, mix well and wrap it with plastic wrap, continue to steam it in the pot for 25 minutes, until it is cooked;
6.
After the snow skin is steamed, turn off the heat, wait for a while to cool, and knead the steamed flour into a smooth dough with your hands (wear disposable gloves);
7.
According to your own taste, add an appropriate amount of fruit and vegetable powder, knead it thoroughly, put it in a fresh-keeping box, and keep it in the refrigerator for 1-2 hours;
8.
Divide the red bean paste into 20 grams each, and divide the refrigerated colored snow skin into 30 grams each, and roll them into rounds for later use;
9.
Take a piece of ice skin, knead it round and press flat, put the red bean paste on top of the ice skin, slowly push it up with the belly of the index finger of your right hand, pushing it as evenly as possible;
10.
After the snowy mooncakes are rounded, they are dipped in a little cake powder and placed in a mold of your choice to form a shape;
11.
Color snowy moon cakes, you can DIY as you like;
12.
Put the finished snowy mooncakes in an airtight box, and put them in the refrigerator overnight before eating.
Tips:
1. The color of the ice can be adjusted and combined at will.
2. The cake flour is just to fry the glutinous rice flour to prevent adhesion.
3. The filling can be replaced at will by choosing the taste you like.
4. The steamed noodles should be very smooth and flat. If the surface color is different, it may be unripe. You need to extend the steaming time.