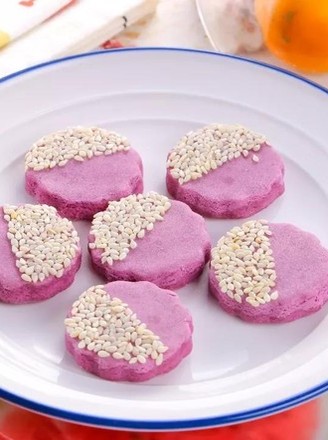
Three-color Snowy Mooncakes
1.
Prepare snow skin materials.
2.
Put all the powders in a pot.
3.
Then pour the milk.
4.
Use a manual whisk to mix evenly until there is no powder agglomeration.
5.
Add corn oil and condensed milk.
6.
Mix well again until no corn oil is visible.
7.
Pour the mixed liquid into a bowl and put it in the pot.
8.
In order to prevent water from entering the bowl during heating, buckle a suitable plate on the bowl, and then cover the pot and steam for 60 minutes.
9.
Next, prepare the snowy mooncake filling: Divide the filling into 18 portions, each about 25 grams.
10.
Use a silicone knife to check if the inside of the snow skin is steamed (there is no liquid in the middle of the dough, and the inside and outside colors are the same.)
11.
After the dough is not hot, you can knead the dough. Put on disposable gloves and knead the oil on the surface into the dough.
12.
After kneading, divide the dough into three equal parts.
13.
Take a dough and add cocoa powder.
14.
Then knead well.
15.
Take another dough and add matcha powder.
16.
Then knead well.
17.
After kneading everything, divide the three colored doughs into 6 equal parts.
18.
Take a small dough and press it into a bowl with your hands.
19.
Put the moon cake filling.
20.
Then buckle it over and wrap the skin on the filling.
21.
Then turn it over and close up with the mouth of the hand.
22.
Tighten the mouth tightly.
23.
Then use the palms of both hands to make a circle and put it into the mold.
24.
Gently buckle the moon cake mold on the silicone cushion, and press it hard to shape it.
25.
Then demould, and the snowy mooncake is ready. (If you make snowy mooncakes of different colors together, you can add a little dough of other colors to press together)
26.
Finished picture.
Tips:
1. The time of snow skin steaming is different because of the size of the steaming bowl. Pay attention to it when steaming.
2. If the snowy skin feels sticky when kneading the dough, you can wrap a layer of cake powder in front of the mold.
3. The color of the ice skin can be matched by yourself.