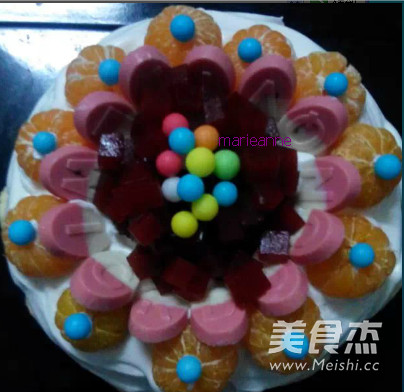
8 Inch Birthday Cake
1.
First prepare the ingredients for the chiffon cake (weigh it in the kitchen), and separate the 4 eggs with an egg white separator, and put them in two stainless steel basins (one for egg yolk and one for egg whites, and no oil or water in the basin). The bottom of the stainless steel basin is best to have an arc, so that there is no dead corner when sending.
2.
Add 30 grams of soft sugar to the egg yolk and mix well with a manual whisk
3.
Add 40 grams of pure milk and 40 grams of vegetable oil to the egg yolk, mix well,
4.
Use a flour sieve to sift 85 grams of low-gluten flour into the egg yolk. If there is no low-gluten flour, you can also mix 40 grams of high-gluten flour + 45 grams of cornstarch.
5.
Stir it up and down evenly into such a particle-free batter,
6.
Use an electric whisk to beat the egg whites (add white sugar to the egg whites three times), and add one third of the white sugar when the egg whites are in the shape of fish bubbles.
7.
Continue whipping until the egg whites begin to become delicate, there are no obvious bubbles, and when the color turns white, add 1/3 of the sugar and continue whipping
8.
When the egg whites have lines, add the remaining sugar. Continue to beat for a while,
9.
When the whisk is hit, the head is gently lifted from the bottom of the basin, and the front end has a small straight tip that will not bend, so it's done. The beaten egg whites have no fluidity, so they are not spilled when they are poured into the bowl (the egg whites will not flow down when the bowl is facing downward). After the egg whites are beaten, preheat the oven for 10 minutes at 120 degrees
10.
Take 1/3 of the egg white and put it in the egg yolk paste, and use a spatula to stir evenly like a stir-fry.
11.
Then add 1/3 to the egg yolk paste bowl, from the bottom of the bowl, stir evenly
12.
Pour the batter mixed in the egg yolk batter bowl back into the remaining egg whites and mix evenly. The purpose of pouring it back is to prevent the unmixed part of the egg yolk paste at the bottom of the basin. During the process, the movements should be light and fast, and the mixing should be greatly and carefully.
13.
Pour the batter into an 8-inch mold and shake a few times to produce bubbles
14.
Put it in the oven, the penultimate level, 120 degrees, up and down fire for 60 minutes (oven time and temperature should be arranged according to your own volume and temperature, small volume oven should be high temperature and short time baking, large volume oven should be low temperature and long time Bake, medium-volume bake at medium temperature and medium time)
15.
Immediately after baking, hold the mold and shake the front side twice
16.
Place it upside down on the grilling net. Release the mold after letting cool,
17.
Use a thinner knife or the tail of a spoon to draw a circle around the inner edge of the mold, gently push the bottom movable bottom, and then the mold is successfully demolded
18.
300 grams of whipped cream is beaten with an electric whisk until the lines are obvious, and it does not flow and feels hard.
19.
Cut the cake embryo into two pieces, peel off the sugar tangerines and put on a plate for later use, slice the banana for later use, and cut the hawthorn cake into small cubes.
20.
Place the largest piece of cake on the bottom layer, and spread whipped cream on the bottom piece of cake, smoothing it out as much as possible.
21.
Sprinkle some chopped hawthorn cake on the cream and cover with a second slice of cake.
22.
Spread cream on the top, turn it flat with a spatula, and then wipe the sides. There is no decorating table, and I just wiped it a few times without decorating anyway.
23.
After the cream is applied, the decorated fruits, chocolates, and sugar are placed. First, place the sugar tangerines around the edge of the cake, and then use the chocolate candy to form the petals on the inside of the oranges, and sprinkle the cut hawthorns on the petals. For the cake particles, spread a few colorful sugar on top of the hawthorn cake. Finally, put a piece of blue sugar on top of each orange (the sugar has to be sticky with a little cream to put it out, otherwise it will fall), and the sliced bananas are evenly glued to the side of the cake. Finished! The surface of the cake can be played freely. Make the pattern you want!


Tips:
For novices, it is better to use a movable bottom for the mold. It is easy to remove the film. Do not apply oil on the mold. The mold wall is too slippery. The cake will not be fluffy if it can't climb. If there are small holes on the cream, it means that the cream has been beaten too much. It can be done until the cream does not flow and does not fall off.