Blueberry Gradient Mousse
1. Wash 250g blueberries and drain the water
2. Put it in a small milk pan, preferably a non-stick pan. (After using it for so many years, I think Xueping Pan is really convenient. I have used it for many dishes.)
3. Add 40g sugar and 20g lemon juice
4. Stir on a low heat without adding water. Be sure to keep stirring, otherwise the sugar will mash and make it bitter.
5. Cook until the juice is thick and the blueberries are basically melted, and the blueberry sauce is ready. Isn’t it simple? (I personally like to leave some incompletely melted fruit pieces to increase the taste.)
6. Cut 35g butter into small pieces and put it in a small bowl. Heat over water until the butter melts.
7. Take out 80g of the Oreo biscuits with the filling (quietly remind that there are ground Oreo biscuits crumbs in the bakery, but I can’t use that much at a time and didn’t buy one)
8. Crush it with a rolling pin, and a pot of soil is ready at this time. (Everyone, the Eight Immortals cross the sea and show their magical powers. Pack them in food bags and then roll them up. You can do anything, depending on your liking.)
9. Add the butter that has just melted into the soil. Bah, it's the butter that has just melted into the biscuits.
10. Stir well
11. Put it into a 6-inch live-bottom cake mold and place it in the refrigerator and freeze for later use
12. Take 15g gelatin tablets and soak in cold water to soften
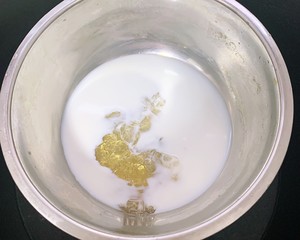
13. Put the soaked gelatin tablets into 75g of milk, dissolve them in insulated water, and wait for the gelatin tablets to dissolve completely.
14. This is completely dissolved
15. Take 300g whipped cream and add 30g sugar to beat
16. I use Anjia's whipped cream
17. Just pass it to 6 points, which is a state with lines and fluidity.
18. Add 130 g of thick yogurt (I used Anmushi, but I forgot to buy it. I bought it temporarily. You can choose economical yogurt, but it tastes good unexpectedly)
19. Pour the melted gelatin flakes in the milk from step 13, and stir evenly.
20. At this time we started to color, because we are making a gradient blueberry mousse this time, and divide the mousse into three parts. The bottom layer has the darkest color. I choose more mousse and the top two layers are evenly divided. You can also choose to divide the mousse into three equal parts.
21. Add the boiled blueberry sauce to the first layer of mousse. How much blueberry sauce you add depends on how deep you want it to be. Sisters, do you have time for free art creation, haha.
22. Pour the color-adjusted blueberry sauce into the mold, flatten it with a silicone spatula, and shake the mold to remove bubbles.
23. The first layer has been laid, and can be placed in the freezer layer of the refrigerator for 40 minutes-1 hour (in order not to overturn the car, I directly freeze it for 1 hour)
24. The first layer is frozen
25. This is the second layer of mousse that I adjusted. It must be lighter than the first layer in order to have a gradual effect.
26. Pour the second layer of mousse into the mold and freeze for the same time as the first layer
27. The second mousse layer is frozen
28. The last layer of mousse, do not add blueberry sauce, just pour the original flavor into the mold, and freeze for the same time as the first layer
29. Dangdangdang, this gradual blueberry mousse is ready~ Demoulding is also very simple, using a hair dryer to blow a circle of hot air next to the mould can easily and without damage.
30. You can also put fruits and mint leaves for decoration
31. It looks good after cutting, the blueberries are too stained, I didn’t wipe the knife for the second time, so the other layers will also be stained.
32. Draw a closer picture to show everyone the layering
33. Cut into two pieces and share with your girlfriend
34. The taste is too rich, with the sourness of blueberries and the sweetness of sugar, plus the silky smoothness of the mousse, and the crunchiness of the Oreo base, it is simply! Not tired at all!
35. There is no more blueberry sauce left. Let’s teach everyone to make a cold blueberry drink to accompany afternoon tea together~
36. Add two spoons of blueberry sauce
37. Fill up with ice cubes
38. Add water/sparkling water/tea, they are all delicious, very suitable for taking pictures, without mixing, the layering is obvious and beautiful
39. Stir evenly and the color is also very nice! what! I like this lipstick in this shade!
40. The fried chicken is delicious, not sweet, there is no guilt at all, hehe 😁
Tips: 1. 6-inch mousse generally uses 15g gelatin slices
2. If you have time, you can do a few more layers of gradation, but freezing takes time. If you don’t have time, you don’t need to make a gradation, just add the blueberry sauce to all the mousse.
3. Attention, generally making mousse is refrigerated and waited to solidify. I want to make it quickly and freeze it. When the last layer of mousse is set, remember to put it in the refrigerator, it will have a normal mousse texture. If the freezing time is long, it will be the taste of ice cream ice cream~


 Buy on JD
 Buy on Amazon