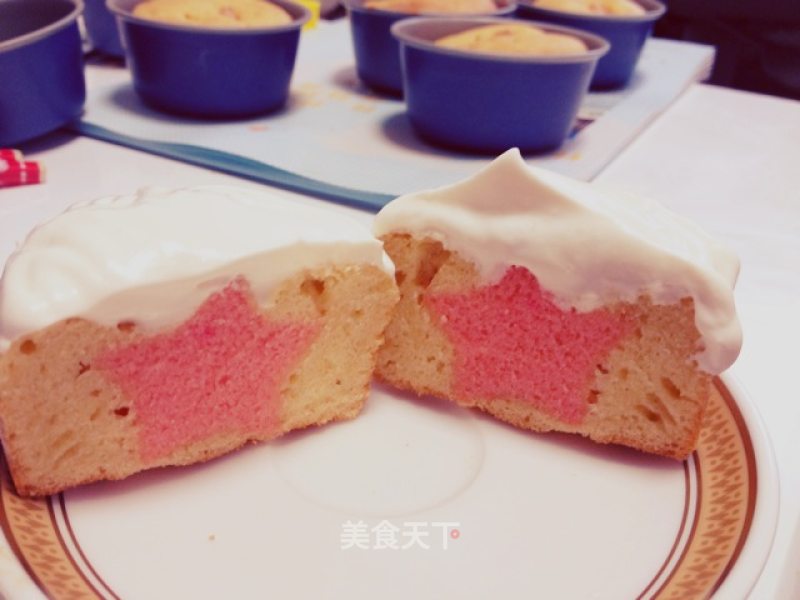
Full of Love---star-shaped Cakes
1.
Prepare all materials
2.
Pour the butter and sugar into a large basin, and use a blender to stir evenly until white.
3.
Break the eggs and pour them into the basin twice, and continue to stir.
4.
Sift the low-gluten flour and an appropriate amount of baking powder into the basin twice and mix well.
5.
Continue to stir with a spatula until smooth
6.
Divide the mixed batter into a third bowl, add an appropriate amount of red food coloring, and mix well.
7.
After stirring the red batter, pour it into the baking pan. Vibrate up and down a few times to make the bubbles disappear.
8.
Put it in the oven and bake on medium heat for 10 minutes.
9.
Pour out the cake body and use a star-shaped mold to press out a small star-shaped cake body.
10.
Press the finished pink star shape~ put it aside for use
11.
6 muffin baking tins, brushed with butter on the bottom.
12.
Pour the batter to a quarter of the baking tin.
13.
Put the pink stars into the batter vertically, as shown in the picture.
14.
Note that the direction of the stars must be marked, and lightly draw a few strokes on the baking tin with a pen. Then pour the remaining batter evenly into the baking tin.
15.
Put it in the oven and bake on medium heat for 18 minutes, then take it out and let it cool.
16.
This is the case after demolding. If you want to be more beautiful, you can put more batter in, so that it will surround the stars.
17.
Whip the cream with sugar and spread it evenly on the top of the finished cake. Cut it with a cutter and you will see the star shape in the cake body
18.
Here's another one~
Tips:
If your batter completely covers the stars, be sure to make a mark. Otherwise, after the cake is finished, the direction of the knife is wrong, and the effect will not be produced at all.
The model with ❤ shape is the best, I only have one set of star shape, what a pity!
The cream on the cake body can be made a lot of shapes, you can try more~



![Seasonal Vegetable Patties [baby Food Supplement] recipe](https://img.simplechinesefood.com/02/024b910033009872aea33017c755a377.jpg)
