Private Vegetable Recipe-milk Meal Bun [handmade Version]
1.
Put the cream at room temperature to soften in advance, and let the milk defrost at room temperature for later use. Yeast, caster sugar, salt.
2.
Sift the high-gluten flour and set aside
3.
Pour the spare high-gluten flour in sequence with yeast, sugar and salt
4.
After step (3), pour the spare milk in the direction of the conditioning bowl.
5.
After step (4), use chopsticks to stir.
6.
After step (5), use your hands to knead the dough slightly.
7.
After step (6), put the dough on the counter, knead the dough into a dough that does not stick to your hands, and then use your fingers to gently flatten the dough and place the cream on the center of the top of the dough.
8.
After step (7), cover the dough and knead the dough again. When the dough and cream are kneaded together, it will be creamy to some extent, and the dough will separate. Make the dough sticky, then knead the dough, repeat the operation.
9.
After the step diagram (8), knead until the cream is fused into the dough.
10.
After step (9), grab the dough and throw it forward in mid-air.
11.
After the step diagram (10), fold the dough forward and upward again, and then push it forward.
12.
After step (11), grasp the dough at 90 degrees (15 minutes in the direction of the clock and 45 minutes in the direction of the clock backwards).
13.
After the step diagram (12), grab the dough and throw it forward from mid-air.
14.
After the step diagram (13), fold the dough forward and upward again, and then push it forward. Repeat the operation to make the dough into a soft dough state. (Step chart (10, 11, 12, 13, 14) requires wrist strength and physical strength.)
15.
After the step diagram (14), place the thumbs of both hands on top of the dough, arch the other fingers horizontally in front, and then gently arch the belt along the clock (or reverse the clock) for a few turns to form a circle After shaping (the body is slightly bent in a squat forward, which is easier to operate.), use a spare conditioning bowl or plastic wrap to cover the dough.
16.
After the step diagram (15), after 90 to 100 minutes, wake up about 2 times to 2.5 times the original.
17.
After the step diagram (16), open the conditioning bowl (or plastic wrap) and use your fingers to press the center of the dough to form a cavity. The dough cavity can be divided without springing back. (If it bounces back quickly, you have to wake up the dough again and consider it yourself.)
18.
After the step diagram (17), flatten the dough evenly, and then divide each 60 grams (or measure by yourself).
19.
After the step diagram (18), grab the bottom of the dough.
20.
After the step diagram (19), fold the dough forward and upward again.
21.
After the step diagram (20), wrap the dough with your hands.
22.
After the step diagram (21), wrap the dough with the arch of your hand and drag it, and follow the clock (reverse clock) in a circle.
23.
After the step diagram (22 ), turn a few circles along the clock (clock backwards).
24.
After the step diagram (23), make the dough round. (Step diagram (19, 20, 21, 22, 23, 24) When kneading the dough, the body is slightly bent forward and half squat, which is easier to operate, you can use both hands to knead the dough at the same time)
25.
After the step diagram (24), cover with plastic wrap, and let the dough wake up for 15 to 20 minutes.
26.
The dough in the step diagram (25) wakes up for 20 minutes.
27.
After the step diagram (26), remove the plastic wrap and flatten the dough evenly. (reference)
28.
After the step diagram (27), fold on the upper third of the left side, press the palm root and fold it to the right side. (reference)
29.
After the step diagram (28 ), fold it in the center from the upper left end, and press the palm root to fold it to the right end. (reference)
30.
After the step diagram (29), use both hands to gently arch the dough back and forth with the dragging, so that the angles at both ends can be formed. (reference). (Step diagram (27, 28, 29, 30) When pressing and shaping the dough, the body is slightly bent forward, which is easier to operate.)
31.
After the step diagram (30), flatten the dough evenly, fold it in half, and knead it into a circle. (reference)
32.
After the step diagram (31), grab the bottom of the dough, and then fold the dough in half, then wrap the dough with your hands and drag it, following the clock (reverse clock) in several circles. (reference)
33.
After the step diagram (32), make the dough round. (Step diagram (31, 32, 33) When pressing and kneading the dough, bend the body slightly forward, which is easier to operate.) (reference)
34.
After the step diagram (33), spread greased paper on the spare baking pan, put the shaped dough, and then cover with plastic wrap, and then wake up the dough.
35.
After the step diagram (34), the dough wakes up 2 times to 2.5 times. (One hour to one and a half hours)
36.
After the step diagram (35), after the spare water sprayer evenly sprays the surface of the dough, apply the egg liquid evenly with a brush.
37.
After the oven is preheated to 200 degrees, turn it to 180 degrees, and then put the baking tray in the oven to bake for 19 to 24 minutes. (This time it’s 24 minutes.)
38.
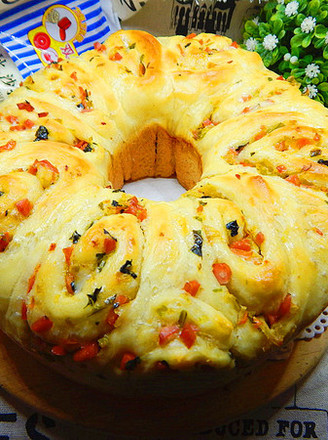
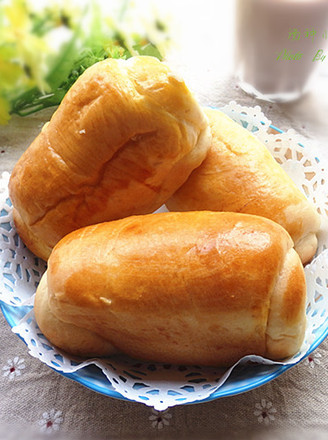
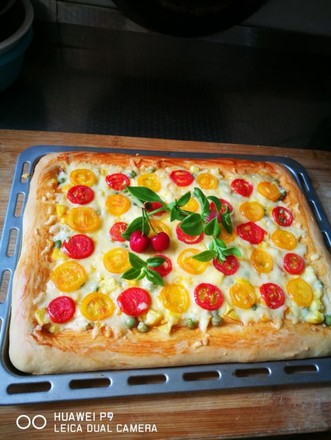
Finished picture.
39.
Finished picture.

![Private Vegetable Recipe-milk Meal Bun [handmade Version] recipe](https://img.simplechinesefood.com/b3/b3c0121096877c345de9793ec9252d2d.jpg "Private Vegetable Recipe-milk Meal Bun [handmade Version] recipe")
Tips:
Afterwords:
1: The room temperature is above 25 degrees (the room temperature in the kitchen is 25 to 27, 28 degrees), and the dough fermentation time is relatively fast.
2: Baking time> If you like the lighter color, bake it to 18 to 19 minutes, and bake it to 23 to 24 minutes for the darker color.
(Sometimes the temperature of the oven will rise after baking several times in a row. At this time, you need to adjust the degree of the oven or cool it before using it. Each oven is slightly different, so please consider it yourself.)
3: Put a glass of water on the baking tray and the dough at the same time (or not, the use and size of the container, as long as it is available in the oven, please consider it yourself).
4: The meal buns made this time are suitable for breakfast, burgers, fillings, and sandwiches. They have a soft and biting texture and are delicious even when they are cooled.
7: "Private Vegetables Recipe-Milk Meal Pack [Manual Version]" Please refer to the log.
http://home.meishichina.com/space-5901869-do-blog-id-541054.html.

![Private Vegetable Recipe-milk Meal Bun [handmade Version]](https://img.simplechinesefood.com/e0/e0d4c83ae82814c4d2bf77bc94200157.jpg "Private Vegetable Recipe-milk Meal Bun [handmade Version]")

![Private Vegetable Recipe-milk Meal Bun [handmade Version] recipe](https://img.simplechinesefood.com/0a/0a8678cbf0b9bf299c0427ecd3ba262e.jpg "Private Vegetable Recipe-milk Meal Bun [handmade Version] recipe")

![Private Vegetable Recipe-milk Meal Bun [handmade Version] recipe](https://img.simplechinesefood.com/5f/5f70aa6771639d2ee6732919266fe021.jpg "Private Vegetable Recipe-milk Meal Bun [handmade Version] recipe")

![Private Vegetable Recipe-milk Meal Bun [handmade Version] recipe](https://img.simplechinesefood.com/4a/4afa606ad5400696d42de9ee6b95cff6.jpg "Private Vegetable Recipe-milk Meal Bun [handmade Version] recipe")

![Private Vegetable Recipe-milk Meal Bun [handmade Version] recipe](https://img.simplechinesefood.com/69/69c95998101266e41ebf2dd5bbb74512.jpg "Private Vegetable Recipe-milk Meal Bun [handmade Version] recipe")

![Private Vegetable Recipe-milk Meal Bun [handmade Version] recipe](https://img.simplechinesefood.com/07/077ea1a5b67d41fc3658638a662ae4bb.jpg "Private Vegetable Recipe-milk Meal Bun [handmade Version] recipe")

![Private Vegetable Recipe-milk Meal Bun [handmade Version] recipe](https://img.simplechinesefood.com/02/02d93a796ea481a7f366d3d49cfcc869.jpg "Private Vegetable Recipe-milk Meal Bun [handmade Version] recipe")

![Private Vegetable Recipe-milk Meal Bun [handmade Version] recipe](https://img.simplechinesefood.com/e1/e1d2f221d3b12d097f00b9a0dd704f20.jpg "Private Vegetable Recipe-milk Meal Bun [handmade Version] recipe")

![Private Vegetable Recipe-milk Meal Bun [handmade Version] recipe](https://img.simplechinesefood.com/ec/ec596316a6a0316245398f40cf35752e.jpg "Private Vegetable Recipe-milk Meal Bun [handmade Version] recipe")

![Private Vegetable Recipe-milk Meal Bun [handmade Version] recipe](https://img.simplechinesefood.com/5e/5e4ca5baf48e725194f1979e301d9454.jpg "Private Vegetable Recipe-milk Meal Bun [handmade Version] recipe")

![Private Vegetable Recipe-milk Meal Bun [handmade Version] recipe](https://img.simplechinesefood.com/ad/ad8ec90270689556dbaf3c57297a52fc.jpg "Private Vegetable Recipe-milk Meal Bun [handmade Version] recipe")

![Private Vegetable Recipe-milk Meal Bun [handmade Version] recipe](https://img.simplechinesefood.com/8e/8eeee7f5344500c0eac4e8e69916205f.jpg "Private Vegetable Recipe-milk Meal Bun [handmade Version] recipe")

![Private Vegetable Recipe-milk Meal Bun [handmade Version] recipe](https://img.simplechinesefood.com/87/87f53738aca25d348fc84ada768bb39f.jpg "Private Vegetable Recipe-milk Meal Bun [handmade Version] recipe")

![Private Vegetable Recipe-milk Meal Bun [handmade Version] recipe](https://img.simplechinesefood.com/d8/d816d5591b32fb65fbab8adf16efc45f.jpg "Private Vegetable Recipe-milk Meal Bun [handmade Version] recipe")

![Private Vegetable Recipe-milk Meal Bun [handmade Version] recipe](https://img.simplechinesefood.com/32/324767e992b02956aadbc131db162728.jpg "Private Vegetable Recipe-milk Meal Bun [handmade Version] recipe")

![Private Vegetable Recipe-milk Meal Bun [handmade Version] recipe](https://img.simplechinesefood.com/49/4958d474581933abfb782a030eaec626.jpg "Private Vegetable Recipe-milk Meal Bun [handmade Version] recipe")

![Private Vegetable Recipe-milk Meal Bun [handmade Version] recipe](https://img.simplechinesefood.com/ea/ea8e55d5682a4a03684c8757a603959f.jpg "Private Vegetable Recipe-milk Meal Bun [handmade Version] recipe")

![Private Vegetable Recipe-milk Meal Bun [handmade Version] recipe](https://img.simplechinesefood.com/97/9705748795de0490d5e258cd9b9242ef.jpg "Private Vegetable Recipe-milk Meal Bun [handmade Version] recipe")

![Private Vegetable Recipe-milk Meal Bun [handmade Version] recipe](https://img.simplechinesefood.com/cb/cbeb4d453615be77ae525dffb8b6925c.jpg "Private Vegetable Recipe-milk Meal Bun [handmade Version] recipe")

![Private Vegetable Recipe-milk Meal Bun [handmade Version] recipe](https://img.simplechinesefood.com/59/59f89bae58185df6b1c0ecaa24e3cdfd.jpg "Private Vegetable Recipe-milk Meal Bun [handmade Version] recipe")

![Private Vegetable Recipe-milk Meal Bun [handmade Version] recipe](https://img.simplechinesefood.com/7d/7d54b966e01d35d3862133614ff6147b.jpg "Private Vegetable Recipe-milk Meal Bun [handmade Version] recipe")

![Private Vegetable Recipe-milk Meal Bun [handmade Version] recipe](https://img.simplechinesefood.com/ab/ab24d882b49b5e51f302dbe1462604e6.jpg "Private Vegetable Recipe-milk Meal Bun [handmade Version] recipe")

![Private Vegetable Recipe-milk Meal Bun [handmade Version] recipe](https://img.simplechinesefood.com/24/245d1281b2966e3f1b22a7fb0faa185c.jpg "Private Vegetable Recipe-milk Meal Bun [handmade Version] recipe")

![Private Vegetable Recipe-milk Meal Bun [handmade Version] recipe](https://img.simplechinesefood.com/87/874f78453a8606a0d247227706607717.jpg "Private Vegetable Recipe-milk Meal Bun [handmade Version] recipe")

![Private Vegetable Recipe-milk Meal Bun [handmade Version] recipe](https://img.simplechinesefood.com/6f/6f1183839aaee180c7279ece2377f56e.jpg "Private Vegetable Recipe-milk Meal Bun [handmade Version] recipe")

![Private Vegetable Recipe-milk Meal Bun [handmade Version] recipe](https://img.simplechinesefood.com/b1/b1a2567c7b1f1b4f3d6503930a2cf1cf.jpg "Private Vegetable Recipe-milk Meal Bun [handmade Version] recipe")

![Private Vegetable Recipe-milk Meal Bun [handmade Version] recipe](https://img.simplechinesefood.com/39/393ee6f7f493b8fcd743fabbdfb8359f.jpg "Private Vegetable Recipe-milk Meal Bun [handmade Version] recipe")

![Private Vegetable Recipe-milk Meal Bun [handmade Version] recipe](https://img.simplechinesefood.com/c0/c06ddfc4de741b5f4f90531da1d26e97.jpg "Private Vegetable Recipe-milk Meal Bun [handmade Version] recipe")

![Private Vegetable Recipe-milk Meal Bun [handmade Version] recipe](https://img.simplechinesefood.com/dc/dc1c3ad19963d6b6aa8fc302d4573d4e.jpg "Private Vegetable Recipe-milk Meal Bun [handmade Version] recipe")

![Private Vegetable Recipe-milk Meal Bun [handmade Version] recipe](https://img.simplechinesefood.com/8d/8d92947eb445858ffa0f2939d1c85279.jpg "Private Vegetable Recipe-milk Meal Bun [handmade Version] recipe")

![Private Vegetable Recipe-milk Meal Bun [handmade Version] recipe](https://img.simplechinesefood.com/19/1990aabb12594f956287c011d9de3c4c.jpg "Private Vegetable Recipe-milk Meal Bun [handmade Version] recipe")

![Private Vegetable Recipe-milk Meal Bun [handmade Version] recipe](https://img.simplechinesefood.com/a4/a44e0a68557d1f9309cccc0318decfa9.jpg "Private Vegetable Recipe-milk Meal Bun [handmade Version] recipe")

![Private Vegetable Recipe-milk Meal Bun [handmade Version] recipe](https://img.simplechinesefood.com/67/673122830587cc54e388010d94f826e3.jpg "Private Vegetable Recipe-milk Meal Bun [handmade Version] recipe")

![Private Vegetable Recipe-milk Meal Bun [handmade Version] recipe](https://img.simplechinesefood.com/88/880cc08a8f2f662bcd3e92b42192bdac.jpg "Private Vegetable Recipe-milk Meal Bun [handmade Version] recipe")

![Private Vegetable Recipe-milk Meal Bun [handmade Version] recipe](https://img.simplechinesefood.com/59/596760a963d927ff60c1d57599b65ce5.jpg "Private Vegetable Recipe-milk Meal Bun [handmade Version] recipe")

![Private Vegetable Recipe-milk Meal Bun [handmade Version] recipe](https://img.simplechinesefood.com/6c/6cff3c2df3b9c4315a6a61e3ce7db078.jpg "Private Vegetable Recipe-milk Meal Bun [handmade Version] recipe")

![Private Vegetable Recipe-milk Meal Bun [handmade Version] recipe](https://img.simplechinesefood.com/c8/c8a9b977f207b0acda36ae38b2646372.jpg "Private Vegetable Recipe-milk Meal Bun [handmade Version] recipe")

![Private Vegetable Recipe-milk Meal Bun [handmade Version] recipe](https://img.simplechinesefood.com/48/48968efe69dc383b0bd1712915df1ca9.jpg "Private Vegetable Recipe-milk Meal Bun [handmade Version] recipe")

![Private Vegetable Recipe-milk Meal Bun [handmade Version] recipe](https://img.simplechinesefood.com/4c/4c2a6daa6d9393e7a797f483d5113b1b.jpg "Private Vegetable Recipe-milk Meal Bun [handmade Version] recipe")