Ring Central Flower Bread
1. First put the milk and eggs in the mixing bowl, pour the flour, salt and sugar on both ends of the mixing bowl, dig a hole in the middle of the flour, and pour the yeast into it. Then mix the dough evenly. In addition, soften the butter and set aside.
2. Dough moisture judgment 1: Knead for a few minutes first, press the dough in the palm of your hand, the dough will not fall off when the inverted button is pressed.
3. Dough moisture judgment 2: Pull off the dough, there is still some batter remaining on your hands, but after turning your hands on the dough a few times, the dough on your hands returns to the dough. Explain that the dough humidity is enough. If it is too dry, add milk or water in an appropriate amount.
4. Put the kneaded noodles in a bowl, wrap them with plastic wrap, and refrigerate them for 20-30 minutes.
5. Take out the dough from the refrigerator and start kneading. The dough will be very wet and sticky at first. You can press the dough with your hands, press and knead, and use a scraper to help scrape the batter pasted on the chopping board into the dough. Knead the dough for a few minutes to form a dough and slowly begin to become elastic.
6. Check the dough, it has been expanded initially. But it will break as soon as you support it.
7. Add the softened butter at this time. It will be very wet and sticky at first, but after a short time it will become dough again.
8. Just like washing clothes, press one end of the dough with one hand. With the other hand, rub the dough back and forth.
9. You can also lift one end of the dough and throw the other end on the table, each time you smash it ten times, to make the dough as long as possible, and then fold it in half, and then continue to beat it again.
10. Knead until the film can be pulled out. The dough is opened by hand, the surface is smooth and not easy to break. And it can be seen that there are slight bubbles on the surface of the dough. The dough is kneaded.
11. Put the kneaded dough into a bowl and wrap it in plastic wrap.
12. Put the dough in the upper layer of the oven. Put a pan of hot water in a baking tray on the bottom layer, close the oven door, and let the dough ferment (no need to turn on the oven fermenting function).
13. Just spread the dough to 2-2.5 times the size of the original dough. You can dip your fingers in flour and insert it into the middle of the dough. If the area of the dent is as big as the finger, and the recovery is slow, the dough is ready for fermentation.
14. After pressing the dough, divide it into five equal parts, round it, cover with plastic wrap, and let it rest for 15 minutes.
15. Huanzhonghuan Flower Bread Wrap Method: Roll out the proofed dough to the same width as the sausage, and thin the bottom.
16. Huanzhonghuan Flower Bread Wrap Method: Roll up the sausage from top to bottom and pinch it tightly.
17. When the dough is closed, use a greased knife to cut 5 cuts to the size of the dough. When cutting, do not cut the bottom, only cut until the sausage is broken. (I cut several methods, four knives, five knives, and six knives, mainly depending on the size of the dough and master it myself).
18. Separate the adjacent petals and shape the dough. (This is a flower that becomes a five-petal leaf after being cut four times)
19. In another wrapping method, the petals that come out have no rings: roll the dough into an oval shape, and put the sausage in it vertically.
20. Tighten the head, tail, and bottom, and pinch tightly.
21. Make a few more cuts, remembering that the bottom cannot be cut off. Adjust the shape.
22. Put the finished flower bread dough into a baking tray lined with greased paper, put the baking tray into the upper layer of the oven, and sit a pot of hot water under the baking tray. Close the oven door for a second fermentation.
23. Chop the green onion leaves, add a little egg liquid and stir well. In another bowl, beat the eggs, add a few drops of milk, and stir well. (A few drops of milk from the egg can make the surface of the bread not too hard)
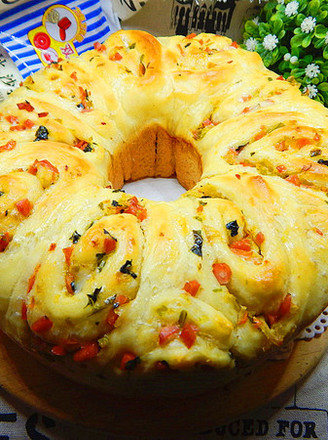
24. Take out the second cooked bread dough. (Preheat the oven to 170 degrees at this time) Brush the egg liquid evenly on the surface of the bread. And put the chives in the middle of the wreath. (Forgot to take a picture at this step, you can look at the finished product and make it up, sorry).
25. Put the bread in the middle of the oven and fire up and down at 180 degrees for 20 minutes. The surface is colored satisfactorily and covered with tin foil. The bottom temperature of my oven is too high, so I turn it down to 150 degrees.
26. Take out the toasted bread and let it cool, and seal it with a fresh-keeping box or fresh-keeping bag after it has cooled.
27. The picture shows the flower bread in the ring without ring.
28. Let's put on another flower bread with a ring in the middle. Which one do you prefer? I like Central Central~
Tips: 1. Don't put milk in a hurry when making noodles. Reserve ten grams, and then add it as appropriate, depending on the humidity of the dough. 2. Put the dough in the refrigerator first to destroy the original structure of the dough structure, so that it is easier to knead the dough to the expansion stage. 3. To make styling bread, the dough does not need to pursue glove film, just knead it to the expanded state. 4. When the dough is put into the oven to ferment, just put a plate of hot water underneath, and the fermentation speed is also quite fast. I heard from a senior that the low temperature function of the oven can easily affect the temperature of the oven if the oven is turned on frequently.


 Buy on JD
 Buy on Amazon