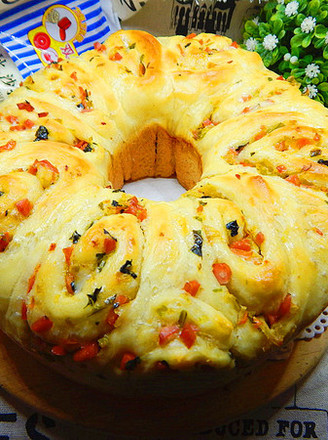
Pork Floss Cheese Strips
1.
Cut butter into cubes and soften at room temperature. Take 50 grams of warm water to melt the yeast and let it stand for 5 minutes. Then the yeast water and other dough ingredients (except butter) are all mixed together.
2.
Knead it. It is not difficult to knead the noodles by hand, and it does not require a lot of effort.
3.
Knead out a rough film, the edge of the hole is not smooth.
4.
Now you can add butter.
5.
I have always felt that there is an excellent word to describe the dough that has just been added with butter-muddy. It's a bit of that, but it's true. Knead hard until the butter is completely absorbed by the dough, and it will become a smooth dough again.
6.
It feels almost done, cut off a piece and stretch it to see how the film comes out. You can pull out a medium-sized film, it is not easy to break, and the edge is smooth after being pierced. (You don't need to pursue the glove membrane blindly, but pay attention to the state of the membrane. I can only put it on my hand for the convenience of taking pictures with one hand...)
7.
Put it in a basin, cover with plastic wrap and ferment at room temperature. This is a one-shot, also called basic fermentation. Areas without heating in winter need external forces.
8.
When the dough has risen to 2.5 times its size, stick the flour with your fingers, and lightly poke the dough. Fingerprints will not rebound immediately, and the dough will not collapse, indicating that the fermentation is just right.
9.
Take out the fermented dough, knead and vent, divide into 8 minutes, and knead into a dough. Cover with plastic wrap and let it rest for 20 minutes. This is a second shot, which is also called an intermediate wakeup.
10.
Then start plastic surgery. Knead the loose dough again to exhaust air, roll out a rectangular piece of dough with a rolling pin, and press the side thinly with your fingers. Put an appropriate amount of pork floss filling.
11.
Roll up. The thinner side is on the outside.
12.
After all the reshaping is completed, put it on the baking tray.
13.
Put it in the oven, put a bowl of warm water at the bottom of not higher than 50 degrees for three times, which is also the final fermentation.
14.
Bread with fillings should be fermented to 1.5 times its size. Brush the egg liquid on the surface after taking it out. At this time, preheat the oven at 180 degrees.
15.
Cut the mozzarella cheese into shreds, put it on the bread, and then squeeze the salad dressing back and forth, and finally sprinkle with dried chives or parsley (also called Basili).
16.
After the surface decoration is completed, put it in the preheated oven, heat up and down 180 degrees, bake for 15 minutes, and serve.


Tips:
1. When kneading any flour into a dough, the amount of water that needs to be added depends on the condition of the dough, and it is related to the region, humidity, and the amount of water absorbed by the flour. If there is less, you can make up water, if there is more, it is not suitable for making up noodles. So the amount of water is only a reference, not a fixed one. It is recommended to reserve 20% of the amount when adding water.
2. The dough will lose moisture during the kneading process, because the amount of water is reserved at the beginning, so pay attention to adding water when kneading the dough. The method is to take a small bowl of water and place it on the edge of the chopping board. When needed, just pat your fingers on the dough.
3. Because it is not a toast, there is no need to reach the complete stage, and there is no need to pursue glove film blindly. The state of the membrane is the most important.
4. The ideal temperature for the first engine is 27 degrees, the ideal temperature for the third engine is 35 degrees, and the ideal humidity is 80-85%. In winter, areas without heating need to use external forces, such as the fermentation function of the oven or electric blankets, etc., but the temperature of the fermentation function of the oven is relatively high, basically reaching 40 degrees, which can be turned on for a period of time and then turned off.
5. The three hairs must be warm water, not hot water. If the temperature exceeds 40 degrees, the fermentation pores will be too large, the dough texture will be rough, and the dough will become sour, because the best reproduction temperature of lactic acid bacteria is 40~45 degrees, if it is at this temperature After proofing, lactic acid bacteria will multiply quickly and make the bread sour.
6. The specific time of all fermentation must be judged according to the specific temperature and the state of the bread.
7. The final degree of fermentation, how many times the fermentation is, is also related to the bread shaping done. If it is Yamagata toast, it must be fermented longer. If it is a fancy bread with clear lines on the surface, the fermentation time must be controlled well, otherwise the pattern will be lost if it is baked again.
8. If the portion is divided into two plates, both plates can be fermented at the same time, but not baked at the same time.
9. The cheese sticks can be cut thinly and arranged densely, which is more attractive. Otherwise, the baked shape will look more like caterpillar bread.
10. Dried chopped shallots can be made by yourself. Wash the chopped shallots and finely chop them, put them in the oven at 150°C and bake for about 10 minutes, or microwave on high heat for 3~5 minutes to dry the chopped shallots. Be careful not to get burnt.
11. Any baking temperature and time are closely related to the temperament of your own oven. The temperature and time are not fixed, please depend on the specific situation of your own oven.