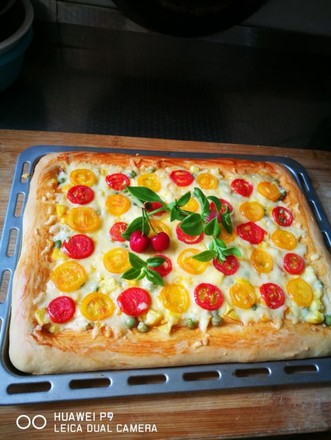
Sea and Land Fresh Pizza-winners of Lezhong Colorful Summer Baking Competition
by Cai Cai Baking House
Favorite
Difficulty
Normal
Time
1h
Serving
2
Today with ample supplies, there are many choices of food. Everyone has their own unique insights on how to eat. Therefore, many people regard themselves as foodies. However, it seems that there are not many foodies around us who not only eat but also make delicious food. Although more and more people are now playing home baking, many novices feel that it not only tests the technology but also requires a lot of tools, so they have been hovering at the door of baking without a deeper step. In fact, I think it is enough to have a small oven and a heart that is keen to explore food. Today, Brother Grid will teach you how to use only a small oven to make delicious sea and land pizzas.
The advantage of making your own pizza is that it is not only more hygienic than the outside, and there is no need to worry about any additives, and you can put everything you like to eat. I think of the pitiful cheese and fillings that cost a lot of money every time you enter the pizza restaurant. At home, you can get all your favorite foods in your pocket in one breath. This mouthful of enjoyment is definitely the driving force for your actions. Okay, then we will explain the making process of this fresh sea and land pizza in super detail, and we are guaranteed to let you see it!
tool:
A small oven
As mentioned above, the only necessary tool for making this pizza is the oven, and we only need a simple oven with baking function, don’t look at this oven which has only 12L, no upper and lower fire control function, and no hot air. Surrounded, but baking cakes, cookies, etc. are not a problem, but the actual temperature of this small oven will be about 30 degrees higher. According to the mainstream recipe on the Internet, the temperature required to bake a pizza is 200 degrees, and the time is generally For 15 minutes, I use a temperature of 150 degrees to bake for 15 minutes, and then turn to 180 degrees for 10 minutes. Everyone’s oven temperament is different. Although the process is a bit more troublesome, as long as you feel your own oven temperament to bake a perfect pizza Excuse me.
List of required ingredients:
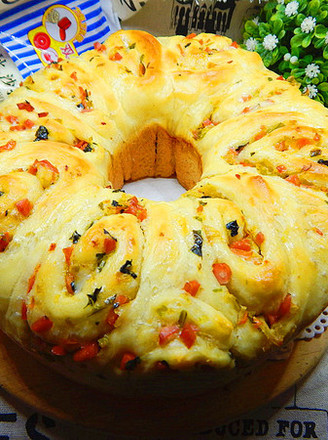
When purchasing ingredients, it is difficult to keep consistent with the list ratio. In many cases, there will be a lot more. It doesn't matter. At the end of the article, Brother Grid will tell you how to use the remaining ingredients to ensure that there is no waste. After all, waste is shameful. Students who don’t have kitchen scales can use rice bowls as measuring tools, such as two bowls of high-gluten flour, one bowl of low-gluten flour, two bowls of water, and so on.
Because this pizza we made is called sea and land fresh pizza, the three essential elements are:
"Sea" means sea prawns;
"Lu" stands for pork, because pigs are terrestrial animals;
"Fresh" means that all ingredients must be fresh. Therefore, we discarded bacon, ham, etc., which are popular for making pizza. Instead, we chose pork belly. The pork belly is relatively tender, not easy to grow old, and contains some fat. The key point is that it is not easy to grow old. After processing, mother no longer has to worry about us eating too many additives! "
The advantage of making your own pizza is that it is not only more hygienic than the outside, and there is no need to worry about any additives, and you can put everything you like to eat. I think of the pitiful cheese and fillings that cost a lot of money every time you enter the pizza restaurant. At home, you can get all your favorite foods in your pocket in one breath. This mouthful of enjoyment is definitely the driving force for your actions. Okay, then we will explain the making process of this fresh sea and land pizza in super detail, and we are guaranteed to let you see it!
tool:
A small oven
As mentioned above, the only necessary tool for making this pizza is the oven, and we only need a simple oven with baking function, don’t look at this oven which has only 12L, no upper and lower fire control function, and no hot air. Surrounded, but baking cakes, cookies, etc. are not a problem, but the actual temperature of this small oven will be about 30 degrees higher. According to the mainstream recipe on the Internet, the temperature required to bake a pizza is 200 degrees, and the time is generally For 15 minutes, I use a temperature of 150 degrees to bake for 15 minutes, and then turn to 180 degrees for 10 minutes. Everyone’s oven temperament is different. Although the process is a bit more troublesome, as long as you feel your own oven temperament to bake a perfect pizza Excuse me.
List of required ingredients:
When purchasing ingredients, it is difficult to keep consistent with the list ratio. In many cases, there will be a lot more. It doesn't matter. At the end of the article, Brother Grid will tell you how to use the remaining ingredients to ensure that there is no waste. After all, waste is shameful. Students who don’t have kitchen scales can use rice bowls as measuring tools, such as two bowls of high-gluten flour, one bowl of low-gluten flour, two bowls of water, and so on.
Because this pizza we made is called sea and land fresh pizza, the three essential elements are:
"Sea" means sea prawns;
"Lu" stands for pork, because pigs are terrestrial animals;
"Fresh" means that all ingredients must be fresh. Therefore, we discarded bacon, ham, etc., which are popular for making pizza. Instead, we chose pork belly. The pork belly is relatively tender, not easy to grow old, and contains some fat. The key point is that it is not easy to grow old. After processing, mother no longer has to worry about us eating too many additives! "