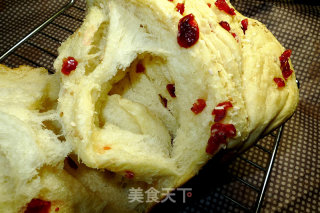
Melaleuca Dried Cranberry Toast
1.
After weighing high flour, eggs, milk, sugar, salt, yeast, and water, put them in the bread bucket in turn.
2.
Put the bread bucket into the bread machine, start a kneading program, and knead it into a wet dough with a smooth surface, as shown in the picture.
3.
Cover the bread bucket with a clean wet towel, cover the bread machine and let it stand for 2 hours.
4.
The dough after standing for two hours, as shown in the picture.
5.
Add 30 grams of butter.
6.
Start a kneading program again and knead it into a smoother dough, as shown in the picture.
7.
Divide the dough into five equal parts (I calculated it: each small dough weighs 109 grams).
8.
Shape five small doughs and let them rest for 15 minutes.
9.
During the relaxation process, it is recommended to cover with a wet towel to prevent the surface from drying out.
10.
Take a small dough, roll it up and down from the middle, and roll it into an oval shape. Brush the surface with melted butter and sprinkle with chopped dried cranberries and coconut.
11.
According to the method of step 12, the five doughs are processed according to the law, and then stacked together to form a stacked dough sheet, as shown in the figure.
12.
Divide the dough into eight pieces.
13.
Put four portions in the bread bucket first.
14.
Stack the remaining four on top.
15.
Select the yogurt program for the bread noodles, set a fermentation time of 45 minutes (I set one hour), and then start the program.
16.
The dough is about eighth full, as shown in the picture.
17.
Brush a layer of whole egg liquid on the surface, and sprinkle in an appropriate amount of dried cranberries, coconut and sesame seeds.
18.
Select the baking program, set it to lightly color, and bake for 45 minutes.
19.
Bake and unmold, and eat after cooling.
20.
Look, the bread has a delicate texture, a thousand layers, and a drawing effect, not bad!


Tips:
1. The amount of water in the recipe is 80 grams, but I actually use 70 grams. This depends on the water absorption of each flour. It is recommended that you do not pour it all at once when you put the water. Generally, leave 10 grams of water, and then see if the situation increases or decreases. .
2. Covering with a wet towel is to prevent the surface of the dough from drying out and affecting the taste of the bread.
3. In order to prevent over-coloring, you can put tin foil on the bread outside the bread bucket, and you can also shorten the baking time by 5-10 minutes.
4. Although the freshly baked bread is delicious, the effect of yeast has not completely stopped. If it is eaten at this time, it will easily cause stomach discomfort. Therefore, it is recommended to let it cool thoroughly and fully discharge the carbon dioxide in the bread before eating.
5. Regarding the setting of the fermentation time, although the original recipe is 45 minutes, I personally found that it is less than eight minutes full during operation. Therefore, I added it to 1 hour. This time is not rigid and depends on the fermentation temperature of the respective bread machine. You can control the room temperature by yourself. The principle is to send the dough to the half-full position of the bread bucket.