Traditional Cherry Pie
1.
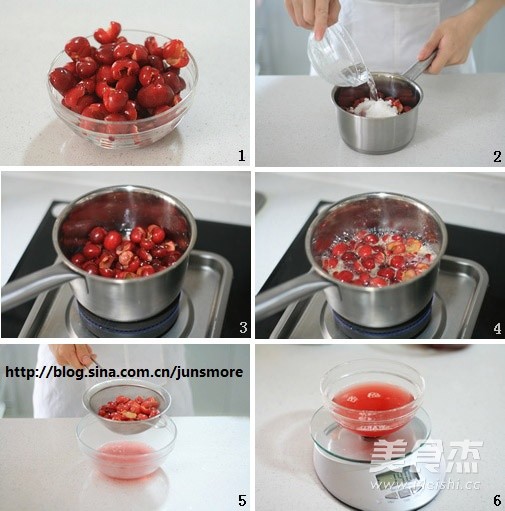
First make the cherry pie filling. Wash the fresh cherries and remove the pits (just break the cherries to remove the pits); put the pitted cherries into the pot, add fine sugar and 60 grams of water; heat the pot to a boil, stir while boiling, so that the sugar is completely melted ; After boiling, turn to low heat and boil for another minute; filter the cooked cherries, filter out the water, and use the filtered cherries for later use; weigh the filtered cherry syrup to see if it reaches 140 grams. If it does not reach, add water (outside the formula weight) to 140 grams

2.
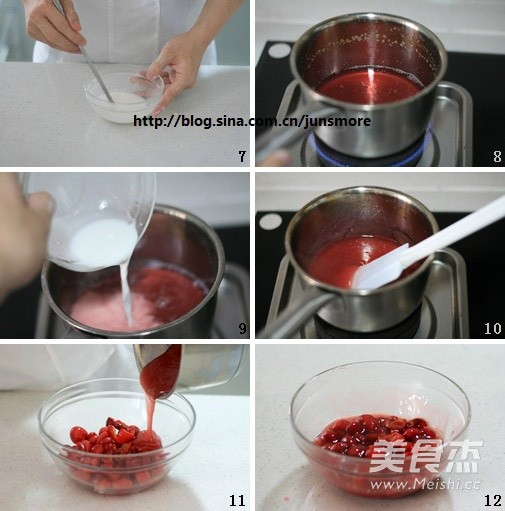
Mix corn starch with 20 grams of water to form water starch; weigh 140 grams of cherry syrup and boil again; after boiling, pour in water starch and stir; cook until thick and transparent and turn off the heat. Add salt and lemon juice and stir well; pour the boiled juice back into the filtered cherries, mix well and serve as cherry pie filling; put the finished cherry pie filling until it is completely cooled and use

3.
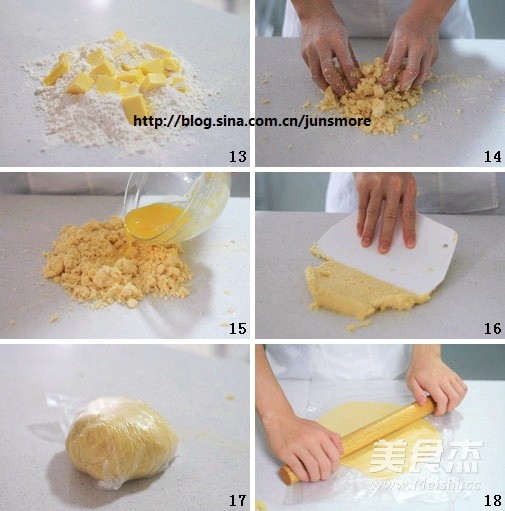
Next, look at how the pie crust is made: cut the butter into small pieces and mix it with the flour; keep pressing and kneading with your hands until the butter and flour are completely mixed, and it is in the state of coarse corn flour; egg yolk, sugar, salt, and cold water are mixed. After mixing evenly, pour it into the flour and butter; press and knead with a scraper (or by hand) to form a moist dough (the dough may be sticky, and it is easier to handle with the scraper than by hand); the kneaded dough is packed in a fresh-keeping bag. Put it in the refrigerator for more than 1 hour; put a fresh-keeping bag on the chopping board, put the refrigerated dough, and then put another fresh-keeping bag. Roll out the dough between two fresh-keeping bags to form dough pieces

4.
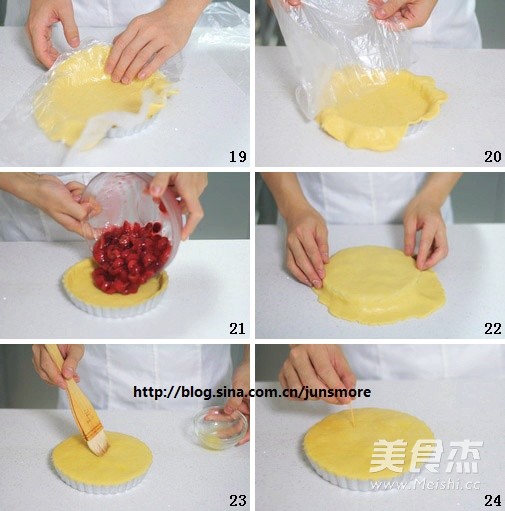
Remove the fresh-keeping bag on the surface, put the dough into the pie pan; remove the remaining fresh-keeping bag, and remove the excess pie crust on the edge. (Because the pie dough is crispy and fragile, it is easy to crack when rolled out directly, and it is not easy to pick up. The preservation bag is used to better handle the dough); pour the cooled cherry filling into the pie; use the same for the rest of the dough Method Roll out the dough sheet and cover it on the surface of the pie; brush a layer of egg liquid on the surface of the pie crust; use a toothpick to pierce some small holes on the surface of the pie crust (this step is very important), and put it in a preheated 220 degree oven. Lower layer, bake for about 25 minutes, until the surface is golden brown

Tips:
1. The pie crust of this pie is very crispy and does not absorb water easily. It is very suitable for making cherry pie fillings. Because the pie filling has a large moisture content, it is not easy to be penetrated by the pie filling and become soft with this pie crust;
2. Brush the surface with whole egg liquid, the baked pie has a beautiful luster. If you don't brush the whole egg liquid, you can brush milk or melted butter, and the brownish-red color will be baked, but it will not be so shiny;
3. The finished cherry pie filling must be completely cooled before use;
4. Before entering the oven, remember to pierce some small holes on the surface of the pie so that the heat generated inside can be released during baking. Otherwise the pie will bulge up or even be cracked;
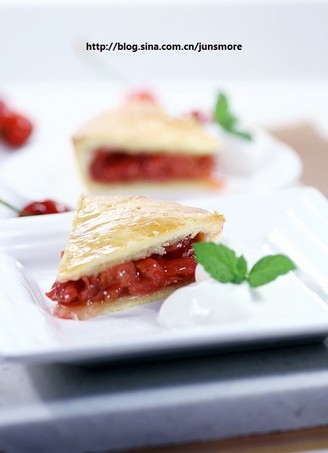
5. Cut the pie into pieces after cooling, because the pie filling will not solidify until it has cooled. If you cut it when it is hot, the filling will easily flow out, which will affect the presentation.




![Seasonal Vegetable Patties [baby Food Supplement] recipe](https://img.simplechinesefood.com/02/024b910033009872aea33017c755a377.jpg)
